A Pictorial Veterinary Guide To Spaying Procedure
What is spaying surgery - cat spaying procedure - and why do we do it?
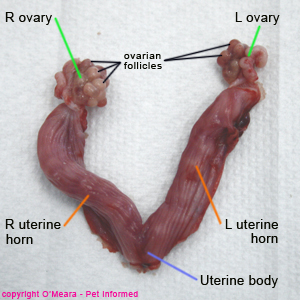
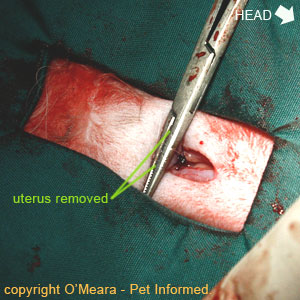
Spaying or desexing is the surgical removal of a female (queen) cat's internal reproductive structures, including her ovaries (site of ova/egg production), Fallopian tubes, uterine horns (the two long tubes of uterus where the foetal kittens develop and grow) and a section of her uterine body (the part of the uterus where the uterine horns merge and become one body).
The picture below shows a cat uterus that has been removed by cat spaying surgery - it is labeled to give you a clear indication of the reproductive structures that are removed at surgery. The uterine horns in this pictured uterus are thicker than normal because this particular cat was in heat or just finishing her heat at the time of desexing surgery. The uterine horns and uterine body of a not-in-heat adult cat or a kitten (early age spay) are much thinner and stretchier than those of an in-season cat (which is why we vets prefer to perform spay surgery on animals that are not in season).
Basically, the parts of the female reproductive tract that get removed are those which are responsible for egg (ova) production, embryo and fetus development and the secretion of the major female hormones (oestrogen and progesterone being the main ones). Removal of these structures plays a big role in feline population control; feline genetic disease control; the prevention and/or treatment of various medical disorders and female cat behavioral modification (e.g. estrogen is responsible for many female cat behavioral traits that some owners find problematic - e.g. roaming, calling for males - and spaying, by removing the source of female hormones like estrogen, may help to resolve these issues).
The rest of this page contains a step-by-step pictorial guide to the process of female cat spaying surgery (the spaying operation that your veterinarian will perform). We can't quite provide you with a video on cat spaying procedure, however, we do hope that our detailed virtual guide to feline spaying will provide you with enough visual information to help you to understand the cat spaying process. Enjoy.
The whole feline spaying procedure, excluding anaesthesia induction and skin preparation time, takes around 5-15 minutes.
WARNING - IN THE INTERESTS OF PROVIDING YOU WITH COMPLETE AND DETAILED INFORMATION, THIS PAGE DOES CONTAIN EXPLICIT MEDICAL AND SURGICAL IMAGES THAT MAY DISTURB SENSITIVE READERS.
CAT SPAYING PROCEDURE STEP 1: The cat is placed under anaesthesia.
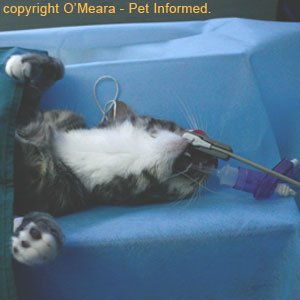
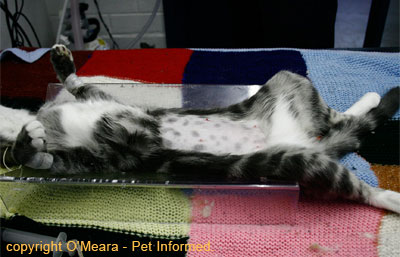
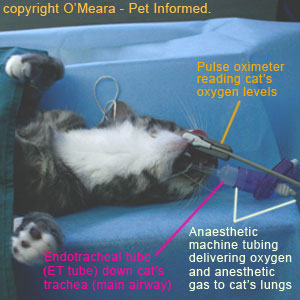 Images 1 and 2:
 The cat must be anesthetised prior to spay surgery being performed, both so that it will not move whilst the spaying procedure is being performed and also so that it will not experience any pain. The cat is given a series of injectable sedative and general anesthetic drugs to make it go to sleep (fall unconscious); an endotracheal (ET) tube is placed down its trachea (main airway) to help it to breathe better and to keep its airway free of vomit and other secretions and the cat is maintained under anesthesia by the addition of anesthetic gas vapours to the oxygen that it breathes (the oxygen and anesthetic gas vapors are supplied by an anesthetic machine, which is linked to the cat's endotracheal tube).
CAT SPAYING PROCEDURE STEP 2: The cat's belly is shaved (clipped free of fur).
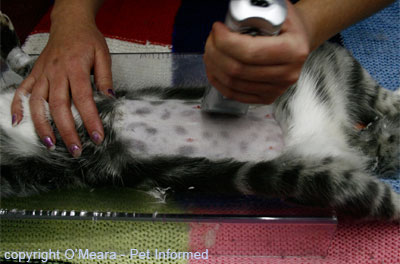 Image 3:
 This a picture of a cat's belly (abdomen) being clipped free of fur prior to female cat desexing surgery being performed. It is important to remove all of the fur so that there will be minimal hair and bacterial contamination of the surgical site.
Author's note: although veterinary nurses take great care to avoid cutting the female cat's nipples with the clippers during pre-surgical shaving, these nipples are tiny and easily nicked. It is not uncommon for the occasional nipple to be cut during pre-surgical clipping. If you see a cut nipple, don't worry! These nipple lacerations generally heal up fine.
 Picture 4:
 This is what the cat's belly will look like when it has been clipped for a spaying procedure.
CAT SPAYING PROCEDURE STEP 3: The surgical site is scrubbed.
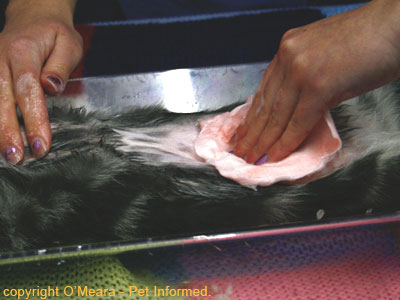 Picture 5:
 This is a picture of a female cat's abdomen (surgical site) being scrubbed with an antiseptic, antibacterial solution (chlorhexidine scrub and alcohol) prior to desexing surgery. This pre-surgical skin preparation reduces the amount of bacterial contamination that is present on the skin prior to the first incision being made.
CAT SPAYING PROCEDURE STEP 4: Draping the cat spay site.
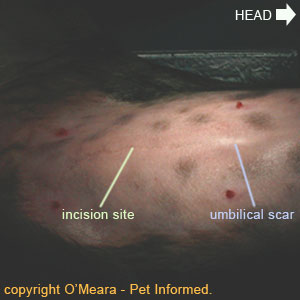
 Picture 6:
 This is a close-up picture of the surgical spay site, just prior to placing the surgical drape on the cat's abdomen. The cat's head is located towards the right of the image. The image shows the abdominal landmarks that most veterinarians use to guide their first spay incision. The first incision (which can be anywhere from 1-3cm long) is usually made about an inch below the animal's umbilical scar (the small white scar in the centre of the cat's abdomen where the umbilical cord once attached), on the midline of the abdomen.
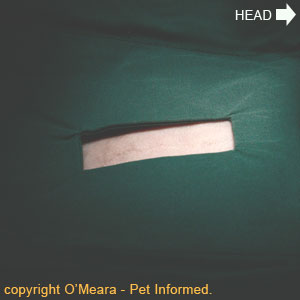
Image 7: A sterile surgical drape is placed around the surgical site. This drape acts to focus the veterinary surgeon's attention on the spay site. It also acts to cover up the non-surgically-prepared, contaminated regions (e.g. the furred, unclipped regions) located outside of the shaved and prepped site so that the veterinarian can not accidentally touch them and inadvertently contaminate the surgical site. Additionally, the drape also provides a sterile surface for the vet to rest instruments periodically during surgery.
CAT SPAYING PROCEDURE STEP 5: The skin is incised and the cat's abdomen entered.
 Photograph 8:
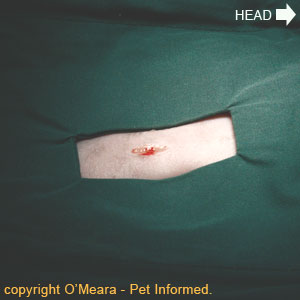
 A small incision (usually around 1cm long, but can be up to 3-4 cm long) is made in the cat's skin, approximately 1 inch below the umbilical scar on the abdominal midline.
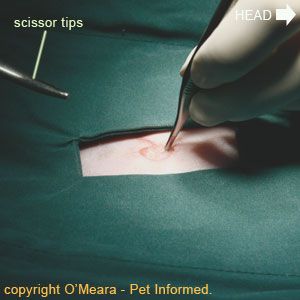
Picture 9: In this image, the veterinary surgeon is removing some of the fat (termed subcutaneous or SC fat) from the incision line region. The fat is the white, shiny substance in the centre of the incision line. There is generally a lot of fat located between the cat's skin and its abdominal wall muscles. The veterinarian will often cut a small amount of this fat away, allowing easy access to and visualisation of the cat's abdominal wall muscles.
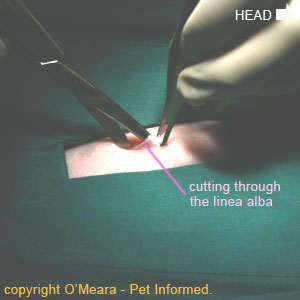
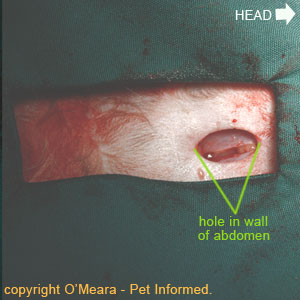 Image 10:
 The veterinarian enters the cat's abdominal cavity by cutting through the abdominal wall musculature on the midline of the abdomen. The veterinarian aims to cut along a central line of scar tissue that joins the right and left sides of the animal's abdominal wall musculature. This line of scar tissue is called the linea alba (literally meaning - "white line"). By cutting through scar tissue, rather than the red muscle located either side of the linea alba, the veterinarian reduces the amount of bleeding incurred in entering the cat's abdominal cavity.
Photograph 11: This is a close-up picture of the incision line after the linea alba has been incised. You can see the hole going into the abdominal cavity.
SPAYING CATS PROCEDURE STEP 6: The first uterine horn is revealed.
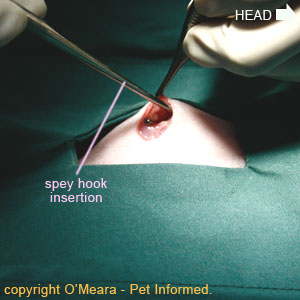
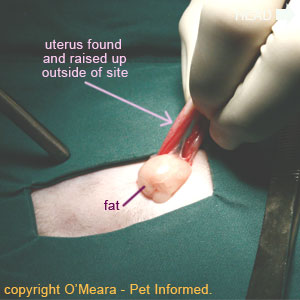 Image 12:
 A spay hook is inserted into the cat's abdominal cavity to hook and draw up the first uterine horn.
Photograph 13: This is a picture of the first uterine horn being lifted up and drawn out through the abdominal incision line.
SPAYING CATS PROCEDURE STEP 7: The ovarian blood vessels are clamped and ligated.

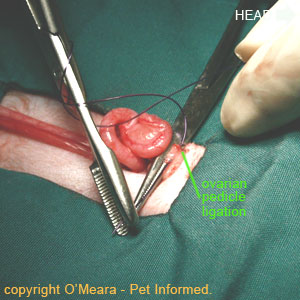 Image 14:
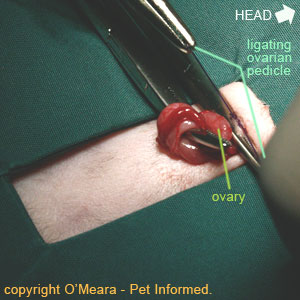
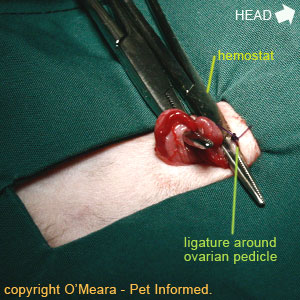
 The blood vessels (artery and vein) supplying the cat's ovary are elevated and clamped off using mosquito hemostats (artery forceps). These hemostat clamps crush and traumatize the ovarian blood vessels, causing them to spasm and narrow in diameter, thereby aiding in preventing excessive ovarian pedicle hemorrhage when the ovary is cut off.
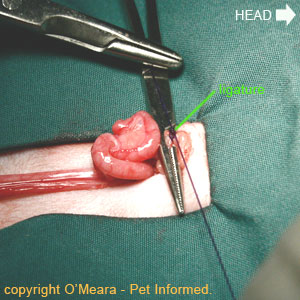
Picture 15: A suture (stitch) is placed around the blood vessels supplying the ovary (the general term for the blood vessels - artery and vein - supplying the ovary is the ovarian pedicle). This suture ties off and occludes the ovarian blood vessels supplying the ovary, thereby preventing excessive ovarian pedicle hemorrhage when the ovary is cut off.
 Pictures 16 and 17:
 More images of the suture (also called a ligature) being placed around the blood vessels supplying the ovary. This suture ties off and occludes the ovarian blood vessels supplying the ovary, thereby preventing excessive ovarian pedicle hemorrhage when the ovary is cut off. Once the ligature has been tied and knotted tightly, the long suture ends are trimmed away leaving only a small knot behind (image 17).
SPAYING PROCEDURE STEP 8: The ovarian pedicle is cut above the sutures.
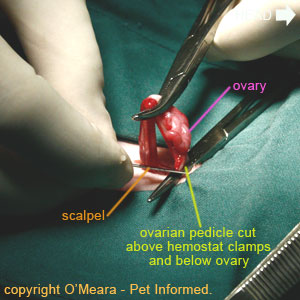
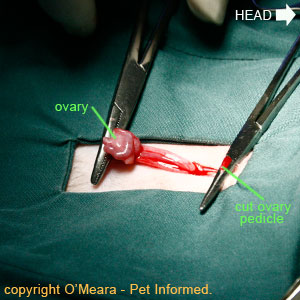 Image 18:
 A scalpel blade is used to cut through the ovarian pedicle (ovarian artery and vein) supplying the ovary. The cut is made above the level of the hemostat clamp and the ovarian pedicle ligature so that the blood vessels (in particular, the ovarian artery) will not bleed when they are incised, but below the ovary such that the ovary will be removed from the ovarian pedicle when the cut is made.
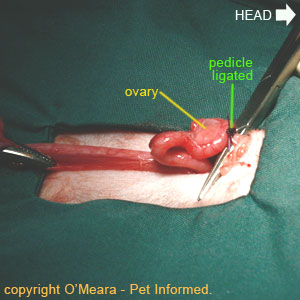
Picture 19: This is the appearance of the ovarian pedicle after the cut has been made. The hemostats are still in place in this image with the ligature located beneath them (hidden from view in this pic) - the hemostats will be removed, allowing the ovarian pedicle and its ligature to return back inside the abdomen. The ovary, still attached to its uterine horn, is reflected caudally (towards the animal's tail).
SPAYING PROCEDURE STEP 9: Steps 6-8 are repeated for the second uterine horn.
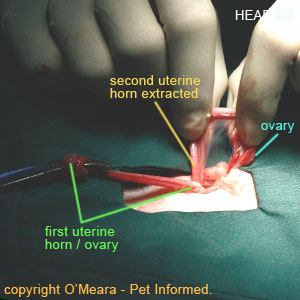
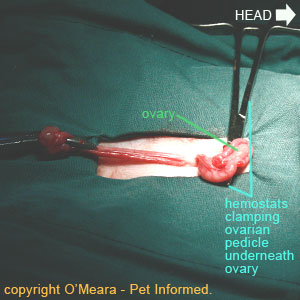 Image 20:
 This is a picture of the second uterine horn being lifted up and drawn out through the cat's abdominal spay incision line.
Photograph 21: The blood vessels (artery and vein) supplying the cat's second ovary are elevated and clamped off using mosquito hemostats (artery forceps). These hemostat clamps crush and traumatise the ovarian blood vessels, causing them to spasm and narrow in diameter, thereby aiding in preventing excessive ovarian pedicle hemorrhage when the second ovary is cut off.
 Pictures 22 and 23:
 As occurred with the first ovarian pedicle, a suture (also called a ligature) is placed around the blood vessels (termed the ovarian pedicle) supplying the second ovary. This suture ties off and occludes the ovarian blood vessels supplying the ovary, thereby preventing excessive ovarian pedicle hemorrhage when the ovary is cut off. Once the ligature has been tied, the long suture ends are trimmed away, leaving a small knot behind (image 23).
Following the placement of this ligature, a scalpel is then used to cut through the ovarian pedicle supplying the second ovary. The cut is made above the level of the hemostat and the ovarian ligature (suture) so that the blood vessels (in particular, the ovarian artery) will not bleed when they are incised, but below the ovary such that the ovary will be removed (along with the uterine horn) from the ovarian pedicle when the cut is made.
CAT SPAYING PROCEDURE STEP 10: The uterine body is revealed and ligated.
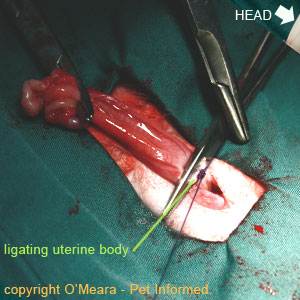 Picture 24:
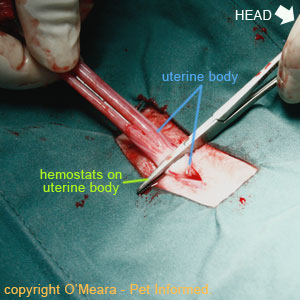
 The two uterine horns are pulled caudally (towards the cat's tail) until the uterine body (the place where the two uterine horns merge and become one uterus body) is revealed and elevated above the level of the skin incision (where it is easily accessible to the surgeon). One or more hemostats are clamped across the uterine body, below the level of the uterine horns and just above the level of the cervix (the cervix is a sphincter-like muscle band located further down the uterine body, which forms a physical barrier between the abdominally-located uterus and the pelvically-located vagina).
Image 25: A suture (ligature) is placed around the uterine body. The suture's role is to close off the tunnel leading into the uterus from the outside world. This will prevent bacteria from entering the abdominal cavity, via ascension from the vagina, once the uterus is removed.
The uterine body ligature also acts to occlude the uterine blood vessels (the uterine arteries and veins), which run along each side of the uterine body and supply the uterus, thereby stopping them from hemorrhaging once the uterine body has been excised (cut off).
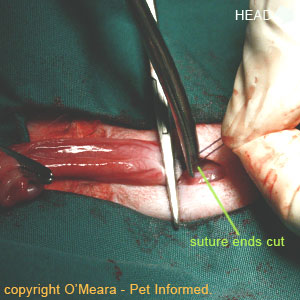
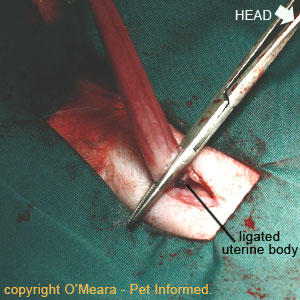 Image 26:
 The ligature is now tied around the feline uterine body and the surgeon is just cutting the long suture ends away from the knot. Vet surgeons don't like to leave a lot of excess suture material lying around inside an animal's abdomen. Excess suture material can lead to irritation and inflammation occurring inside the abdomen and cause adhesions (where the organs get stuck together by scar tissue) to form between organs.
Picture 27: The appearance of the ligature once the long suture ends have been cut off the knot.
SPAYING PROCEDURE STEP 11: A second ligature is placed around the uterine body.
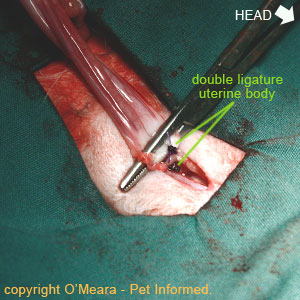 Image 28:
 Termed "double-ligating", it is not uncommon for many veterinary surgeons to place a second ligature around the uterine body (in addition to the first ligature) for extra security.
FELINE SPAYING PROCEDURE STEP 12: The uterine body is transected (cut off).
 Picture 29:
 The uterine body is transected (cut off) above the level of the ligatures.
This essentially completes the process of removing the uterus from the female cat. The animal will now no longer be able to reproduce. This is an irreversible surgical procedure.
CAT SPAYING PROCEDURE STEP 13: The abdominal wall is sutured closed.
 Pictures 30 and 31:
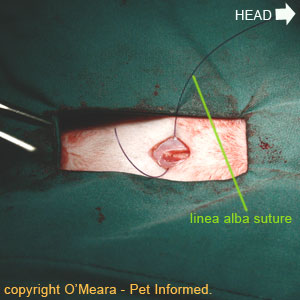
 The surgeon uses absorbable suture material to close the hole in the abdominal wall musculature (linea alba). Because the linea alba is essentially a tendon-like, collagenous structure (made of collagen), it has less blood supply than red muscle and, therefore, takes longer to heal than muscle would. To take this slower healing into account, the veterinarian often uses a longer-lasting suture (a suture that is slower to lose its strength and slower to absorb) to close the linea alba. Because this suture absorbs over time, the vet does not have to remove it later on.
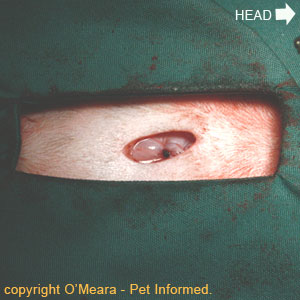 Image 32:
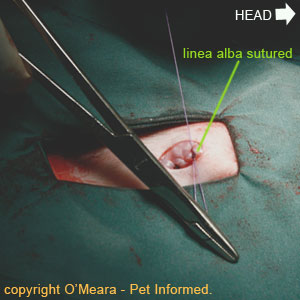
The linea alba has been sutured closed.
SPAYING PROCEDURE STEP 14: The subcutaneous fat layer is sutured closed.
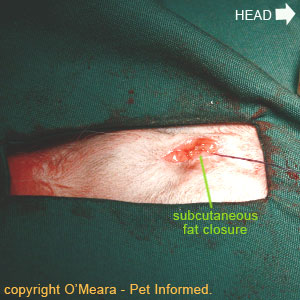 Photo 33:
 The subcutaneous fat layer (also called the SC or sub-q layer) is sutured closed. This layer closure acts to reduce the amount of open space (called 'dead space') located between the abdominal wall and skin layers, thereby reducing the risk of a large, fluid-filled swelling (called a seroma) forming at the surgery site. Basically, whatever space/gap you leave in a surgery site, fluid will pool in - by closing down this open space (dead space), the vet surgeon essentially leaves fewer sites available for inflammatory fluids to pool in.
SPAYING PROCEDURE STEP 15: The skin layer is sutured closed.
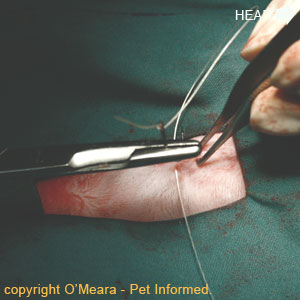
 Images 34 and 35:
 The surgeon is closing the skin using non-absorbable skin sutures. These will need to be removed in 10-14 days.
NOTE - absorbable skin sutures can also be placed. These are called intradermal sutures and they do not need to be removed.
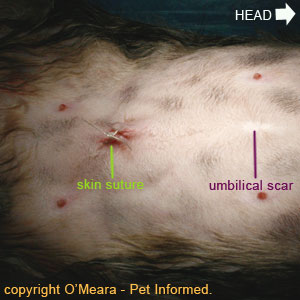
THE FINAL RESULT - A NEWLY DESEXED CAT.
 source: http://www.pet-informed-veterinary-a...procedure.html